No one wants to navigate through a website that is completely text-based and mundane. You would need to add images, videos, forms, newsletters, etc., to ensure maximum traffic to your website.
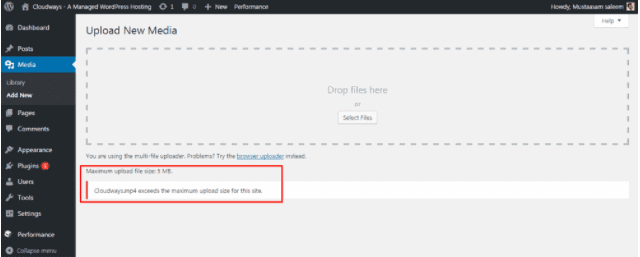
However, before uploading any file, you may have noticed that there is a small inscription under the “Upload New Media” box that says “Maximum upload file size: ‘X’MB” (X being an integer). Some sites offer uploading file sizes up to 100MB while others offer options as low as 2MB.
Fortunately, there are ways you can manipulate this WordPress upload limit cap and this article tells you exactly how to do that.
Contents
Why does this happen anyway? Why do you need to WordPress file upload & WordPress increase upload size?
No one can make do with a 2MB upload file size cap! Well, the answer is pretty straightforward: it’s to prevent security breaches and boost the efficiency of the site. Otherwise, users will have too much freedom to upload large files onto your website and ultimately bring it down to a screeching halt.
Keep in mind that these protocols are not only in place for WordPress sites, this is a general rule that websites all over the world have to adopt. The WordPress maximum upload file size is a configuration setting fixed at the server level. This is why it’s not always possible to make changes from within WordPress.
Before we explore the ins and outs of uploading files in WordPress and how to increase upload size in WordPress, you need to familiarize yourself with the different terminologies and settings to proceed.
Otherwise, going into it blindly will only cause you more damage than any good. Here are the settings that are fundamental in modifying the WordPress upload file size:
1- upload_max_filesize: This defines the maximum threshold of uploading images, videos, GIFs, articles, spreadsheets, forms, etc.
If your file size is bigger than the cap set by the site, it will prevent you from uploading any files to it in the first place. Unfortunately, the WordPress upload size cannot be modified through the dashboard. You will have to access the root level configurations to manually alter them.
2- post_max_size: This defines the maximum size of data that you are allowed to POST.
The maximum upload cap is directly involved in the POST request so in case you exceed it, you will not be allowed to go ahead with the process. If you are uploading multiple files in one go, keep in mind that the size of all the files should fit the set limit.
3- memory_limit: This is a PHP setting that allocates a certain threshold of memory in bytes that a single script can use. This way scripts that are below par are prevented from hogging any available memory on a server.
Suppose, if the memory limit is set to 1GB for some reason, this does not mean that all the scripts in the server will share the 1GB. Rather, the limit is set per script.
Here’s a rule of thumb to abide by:
The post_max_size must be larger than the upload_max_size.
POST data affects how files are uploaded to the website. memory_limit affects how files are uploaded as well so this must be larger than post_max_size. However, that needs to be the standard settings if the memory limit is enabled.
The three of them need to be modified together for the changes to take place effectively. Let’s say you want to upload a large file of about 64 MB. Ideal settings should set the upload_max_filesize to 66 M (66 MB), the post_max_size to 65 M, and the memory_limit to 69 M.
You might wonder, “Why does this say M and not MB? Is that anything new or something entirely different?”
No. It’s just that the files that are meant to be uploaded contain a lot of text-based information. Data needs to be allowed some breathing space as well to process smoothly and quickly.
memory_limit can sometimes cause some issues with uploading files. You may see an error message that says “Allowed memory size exhausted.” At first sight, this may seem like a big conundrum because it’s not even clear what it means.
The memory limit cap is to ensure that resource-hogging elements do not crash the entire site. Installing plugins sometimes causes too much RAM to be used up, ultimately slowing down the website and causing it to malfunction. The memory limit thus overrides everything and puts a hard stop to it before things get messy.
Most PHP scripts are compact allowing each script to reserve a very small amount of RAM. Unless you have a very large program or one that is complicated and require more resources, there’s no need to allocate a significant portion of what you have on everything all at once.
For issues like these, you need to increase your PHP memory limit in WordPress. It’s simple, all you have to do is go to the Info tab and scroll to “PHP memory limit”. If you see that the limit is set unusually above standards, this could mean a malicious plugin may be installed.
The only way around this is to disable every plugin you have installed in your browser until your website stabilizes again. Once it has regained itself, note down the plugin that was contributing to the issue and check if it says anything about the amount of memory it needs to run.
Perhaps reaching out to the plugin developer could help you get some answers for it might be bugging out. Ensure that you are in the clear from your end. If the memory limit is set too low, not a lot of plugins will be able to go on working.
Ways to Upload Files in WordPress
By now you are very well-informed on how to WordPress upload limit media. If you need to brush up on your skills or simply you are new to all of this, there are three surefire ways your files will be uploaded to the site:
- Upload all your media content, themes, and various plugins from the dashboard.
- Use a reliable FTP client to connect to your server.
- Access the hosting provider’s online file manager by logging in to the server.
If you want to upload media files, you can directly use the add/upload file option in the WordPress dashboard. However, for anything other than images or videos, like perhaps a form or a blog article, you have to use the file manager.
How To Increase Maximum WordPress File Upload & WordPress increase upload size? (How to use WordPress file uploader?)
Now that you know the basics of uploading, let’s dive right into the nifty ways in which you can manipulate the file size cap. Here are the five ways how to increase the maximum upload file size in WordPress.
1. PHP.ini And WordPress PHP ini – How to the uploaded file exceeds the upload_max_filesize directive in php.ini. WordPress?
If your website runs on PHP, this is where you will be able to view and edit all the configurations. This file holds all the information criteria for upload size, file timeout, resource limits, etc. Go to the hosting root directory using FTP or SSH and locate the “php.ini” file.
Where is PHP ini in WordPress? Where is PHP ini WordPress? Where is the php.ini file in WordPress? You might be unable to locate the file in which case the option would be to create a file altogether. Open any text editor and create a new file. Input the details as follows:

Next, copy the lines and save the file as “php.ini” for easy access. Then, upload this file using FTP or SSH inside that same root folder.
2. Plugin
When you have zero insight into dabbling with a world of codes, tasks like these can induce panic and fear. If you are unsure about how to go on about this, don’t fret. You can always download and install plugins or simply ask someone to help you with this.
However, if you want to do this on your own, initially look for the best available options for plugins, and then we can get started. Open the plugin settings and edit the number value to save the changes.
3. WordPress
If the previous options are not working well for you, you can always opt for WordPress’s built-in settings. Go to the WordPress root directory and find the “wp-config.php” file. There you will be able to edit the requirements to fit the framework.
Open any text editor and write down these codes:

Then, save the changes. You can set the numbers to your preference and the WordPress increase max upload size should immediately be altered.
4. .htaccess
The website’s most crucial configurations are housed in the .htaccess folder. If the server is running on Apache and PHP is set to act like an Apache module, a few lines of code should do the trick and increase WordPress file upload & WordPress increase upload size. Here is what you need to do:
Access the “.htaccess” file by connecting your server through any reliable FTP client. Navigate to the folder containing all the WordPress files and open the “.htaccess” file in any text editor. Add the following lines of code:

Set the numbers as per your requirements and preferences. The WordPress max_execution_time depicts the time limit spent in any single script. Both the max_execution_time WordPress and max input time are set in seconds. Set a time limit that you think is perfect for your site.
5. Hosting Provider
Some hosting providers feature options where you can increase max upload size WordPress. They provide the leeway to add or edit the capsize as per your preference. Cloudway is an amazing hosting provider that has the aforementioned facilities. This is what you have to do:
- Go to Servers on the top bar
- Navigate to your preferred server
- Locate the Settings & Packages option on the left pane →select Upload Size
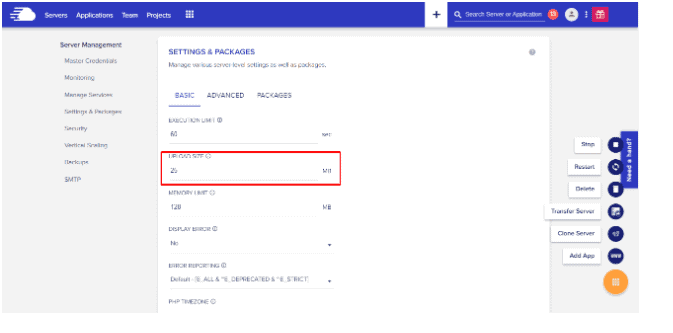
- Set the numbers to your preference and save changes
Keep in mind that if you ever change the theme of the website, you will have to do this all over again to fit the criteria of the theme.
Last Resort
If nothing else works and you cannot figure out your way around the directory, there is no point wasting your time stuck in confusion. Simply ask your host provider to look into the matter and they should be able to help you with an appropriate solution.
Most host providers have 24/7 customer support open so you can log in and tell chat support exactly what you need. Increasing the WordPress maximum upload file size is work they can complete in a snap. It’s far safer to have professionals do it anyway for they are well-trained and have far more practice than any noob.
They might charge you an additional fee but, in most cases, the service is part of their package. So, you should not face too many challenges in asking for their help.
See also:
How To Upload HTML File to WordPress? (Easy Guide)
WP Content Uploads (Easy Way)
How To Fix HTTP Error WordPress Media Upload Easily?
Best Way To Fix: Some of Your Media Failed To Upload Error in WordPress
Conclusion
Increasing the WordPress WordPress file upload size can be an intimidating task. It requires ample knowledge and skills for the process to go to completion.
Again, we would emphasize hiring professionals or asking a veteran to do it. It’s far more risk-free and will save you the trouble of spending time learning something you have no idea of.
However, it can be done on your own. If you want to embark on this journey, take a few days to research and learn. Google everything, ask friends, and groups to guide you through. Once you are familiar with the different functions, you will have a far better understanding of what exactly you are working with.
Sure, you can directly follow the instructions but should you encounter any issue, you will be able to explain what went wrong. At the end of the day, do what you think is the best decision for your company.