Wish to set up XAMPP as well as WordPress, also known as. Mount WordPress in your localhost? This is an excellent idea if you want an advancement site that You can utilize for testing or other functions. XAMPP allows you to run a website from your highly own computer system. And also, once you get it set up, you can rotate up a new WordPress install with just a few clicks.
Yet to mount XAMPP and WordPress can be a little complicated, so you could require an assisting hand.
In this detailed tutorial, We will reveal precisely how to set up XAMPP and a local WordPress advancement site. We will also share some common XAMPP mistakes and troubleshooting suggestions to ensure that you can repair any issues you encounter (though the majority of people won’t experience any problems following this overview!).
At the end of this, you’ll have your own regional WordPress screening atmosphere working on Windows.
Contents
What is XAMPP?
In a nutshell, XAMPP is a local web server that you can set up on your laptop/desktop to simulate a real web server.
It’s an entirely cost-free, open resource Apache web server distribution with MariaDB (formerly MySQL), PHP, and Perl. XAMPP is available for all significant operating systems and is extremely simple to set up and utilize. This discusses why it’s one of the most preferred PHP development atmospheres.

Here’s what the alphabets in XAMPP stand for:
- X- cross-platform (X), as it supports several operating systems
- A- Apache HTTP Server
- M- MariaDB (previously MySQL).
- P- PHP.
- P- PERL.
In addition to the core elements mentioned above, XAMPP typically comes with other helpful tools such as Mercury mail web server, phpMyAdmin for data source administration, Webalizer for internet server log analysis, OpenSSL, Apache Tomcat for running Java code, and also FileZilla FTP server.
Why XAMPP?
As a professional WordPress developer, I can not worry enough about how helpful having a neighborhood advancement setting is. It lets me configure new WordPress installs in an instant. And also, considering that it’s hosted in your area on my computer, there’s no delay in uploading my changes and seeing them come alive on the browser.
Want to try a new theme? Just duplicate and paste it right into your wp-content/themes directory. It’s packed quickly. The same with plugins, as well as changing any kind of settings. No web server delay, no upload problems, and no unnecessary waiting times. Every little thing takes place in real-time.
It resembles taking your cars and truck on a racetrack and also pushing it to their limitations. The best screening setting to go wild with no repercussions (well, almost).
With XAMPP mounted on my PC, I can continue servicing my site even if I go to a remote place without a connection. Developing in your area is also much safe, as your site is offline and far from the prying eyes of cyberpunks (as well as troublesome clients).
Why Make Use Of Xampp to Develop Local WordPress Sites?
Like all software, WordPress has specific requirements to run. The present advised WordPress requirements are:
- PHP variation 7.4 or better.
- MySQL variation 5.7 or greater OR MariaDB version 10.2 or greater.
- HTTPS assistance.
- Apache OR Nginx web server.
- XAMPP checks all packages provided above. It’s cost-free, reputable, easy to use, and works with all significant platforms. You can’t go wrong with it.
- Steps to Install XAMPP on Windows.
- Download and install XAMPP.
- Mount XAMPP.
- Open Up the XAMPP Control Board.
- Beginning Apache as well as MySQL Modules.
Action 1: Download And Install XAMPP.
Start by downloading the most recent variation of XAMPP from Apache Pal’s internet site. The existing updated variation of XAMPP is 8.1.2/ PHP 8.1.2.
Keep in mind: If you’re using Linux or OSX, the setup actions are the same. Just make sure to download and install the ideal variation of XAMPP for your OS.
Action 2: Mount XAMPP.
When downloaded, run the XAMPP installer file.
- Select the components you wish to mount. If you intend to mount a WordPress website with XAMPP, you just need Apache, MySQL, PHP, and phpMyAdmin. I’ll examine all the parts as I wish to try them out later.
- Choose the installation directory for XAMPP (default advised).
- Uncheck Learn more about the Bitnami option. Bitnami offers all-in-one devices to install preferred open-source applications on top of XAMPP. This consists of add-on components for setting up WordPress as well. Nevertheless, we’ll be installing it by hand right here.
- Windows may present you with a Windows Security Alert at the end of the setup. You require to whitelist the Apache HTTP Web server from your Windows Protector Firewall program by clicking the Permit gain access to the button. Inspect the “Personal networks, such as my residence or work network” alternative. This is crucial. XAMPP will not work if you do not examine this and click Permit access.
- Complete the setup and run the XAMPP Control Panel.
Installation Note 1: Shut Down UAC under Windows Settings.
You might be provided with a Customer Gain Access To Control (UAC) warning by Windows. Absolutely nothing to fret about a lot. Just see that you don’t install XAMPP under your Program Data directory site, as UAC can disrupt XAMPP’s composing consents to this directory. The default installment directory site is C: \ XAMPP. So, if you don’t alter it, you must be great.
Microsoft Windows support is a good location to start if you want to find out just how to shut down UAC (not suggested unless necessary).
Installment Note 2: Deactivate Anti-virus and/or Firewall Software Briefly.
Some anti-viruses or firewall programs can trigger concerns with your XAMPP installment. If that holds, it’s recommended that you deactivate them momentarily till XAMPP is installed effectively.
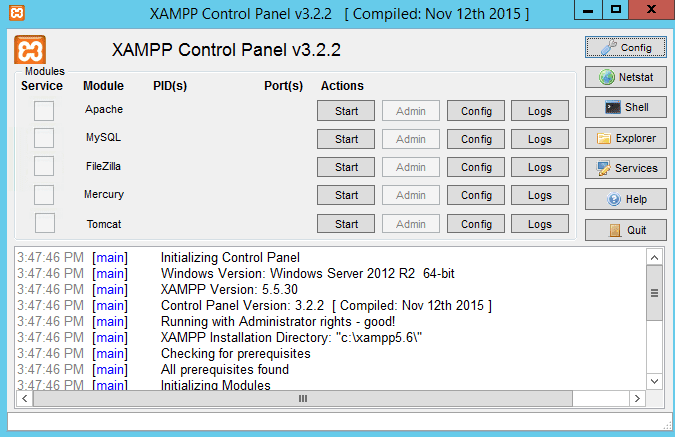
Step 3: Open the XAMPP Control Panel.
The XAMPP Control board sporting activities a basic interface that details all the components of your local web server. It enables you to Start/Stop individual components and gain access to their Admin area, Config data, and Logs with simply a click. Its bottom section also displays all your activities and errors (if any).
Besides the alternatives reviewed above, the XAMPP Control board also includes other switches on its appropriate side:
- Config: to configure total XAMPP settings.
- Netstat: display all energetic TCP links (and ports) on your computer system.
- Shell starts XAMPP in a custom-made command line (CMD).
- Traveler: opens the XAMPP root folder in Windows Traveler.
- Providers: programs all Windows services under Microsoft Management Console.
- Aid: web links to Apache Friends Assistance Forum.
- Quit: quit the XAMPP Control board (the web server will certainly continue to run in the background).
Tip 4: Start Apache as well as MySQL Modules.
- Click the Beginning switch beside the Apache module. If every little thing’s collected properly, your Apache server must start efficiently under ports 83 and 443.
- You can access your Apache server’s dashboard by clicking the Admin button. Conversely, you can reach it through the http://localhost/dashboard/ link in your web browser.
- Then Begin the MySQL component. If you’re presented with a Windows Safety Alert to whitelist mysqld.exe, click Permit access. Like previously, make certain you’ve ticked the “Exclusive networks…” option.
- You can access your phpMyAdmin control panel by clicking the Admin switch close to the MySQL module. Or you can just most likely go to http://localhost/phpmyadmin/ in your web browser. Below, you can manage your web jobs’ MariaDB (or MySQL) data sources.
This concludes the configuration of XAMPP as your regional growth atmosphere. It’s now ready to organize any PHP-based software program (e.g. WordPress).
Evaluating Your XAMPP Setup.
The best method to examine whether your local server has been installed and set up appropriately is to develop a PHP examination web page, area it in XAMPP’s localhost folder, and then attempt accessing it using your web browser.
Let’s do that now.
- Produce a brand-new folder called examination in your C: \ xampp \ htdocs \ directory. You can also conveniently access this directory by clicking the Traveler switch in XAMPP Control Panel and going to the htdocs folder.
- Produce documents called test.php with the code listed below and position it in C: \ xampp \ htdocs \ test folder.
- Attempt seeing http://localhost/test/test.php in your browser. If it presents the words “Hey there, World! Invite to WPMU DEV”, XAMPP is efficiently set up and configured on your system.
Setting Up WordPress In Your Area with XAMPP.
Action 1: Develop a New MySQL Database for Your WordPress Setup.
Before we set up WordPress, we require a database.
- In your XAMPP Control Panel, click the Admin switch in the MySQL section. A brand-new web browser home window will instantly open up with the phpMyAdmin control panel interface. Click on Data sources near the top-left.
- You’ll now be prompted to create a new database. I’ve called mine Wpqanda.
- Once you have entered a name, click Create and close the window.

Action 2: Download And Install as well as Set Up WordPress.
- Download and install the most up-to-date version of WordPress.
- Unzip WordPress in the appropriate folder under XAMPP. In my instance, it’s C:/ xampp/htdocs. Relabel it to whatever you like, yet it’s advised to offer this folder the name of your site. I’m interested likely to call this installment of the WordPress wp test.
- Now, enter your site’s WP folder, and locate the wp-config-sample. PHP file, as well as relabel it wp-config. PHP.
- These lines of code specify the login information for your data source. Update them as per the guidelines below:
- Change “database_name_here” with the name of your database, which in my instance is Wpqanda.
- Change “username_here” with “root” as well as modify the “password_here” area to be empty.
- Conserve the documents and shut them.
- We can proceed with our WordPress setup currently. Open your web browser and also most likely to http://localhost/wptest/.
- You must see the WordPress setup‘s language choice display load.
- As soon as you’ve chosen your language, proceed to the next screen. Enter your site title, admin username, and password information. Click Install WordPress.
Congratulations, you’ve efficiently mounted WordPress on your local server.
Conclusion
There are many ways to start a WordPress website for online business or blogging. We mentioned in this article WordPress installation on localhost using XAMPP application, You can also check other ways like install on Chromebook, or on AWS.