A Simple Guide on How to Add WordPress Drop Down Menu? A clean and organized web page is one of the first things that user notices when they visit a website. Therefore, the design is becoming more and more relevant every day, and a simple navigation menu plays a vital role in the design of a web page.
However, if you have a large number of main pages, adding all of them to the navigation menu can cause it to look cramped and congested. This is where knowing how to add WordPress Drop Down Menu can help.
Contents
Why Add Drop-Down Menus?
When you visit a website, the last thing you would want to see is a cluttered web page. Think about it – have you ever visited a poorly-designed website, spent half an hour searching for the particular page you’re looking for, and then finally gave up due to frustration? This is why clean, organized websites are important – it helps to prevent you from losing visitors.
Most organized websites have a navigation menu bar near the top of the page beside the website’s logo. This menu bar provides you with all the links to the main pages of the website so that you can find the exact page you’re looking for. A clear and intuitive navigation menu bar is vital for keeping your visitors on your website longer.
However, there’s a problem. If you’re starting out with your blog or website, you can probably fit all your pages on the navigation menu bar and still come out with a clean look. But what if you’re running an online store or a large website with hundreds or thousands of different pages?
This is where drop-down menus come in. These menus are those that only show links to other pages when the mouse cursor hovers above them. They do this by organizing your menu items by topics or hierarchy. For example, if you visit an online store, a parent item on the top navigation menu might contain an item called “Electronics”.
As you hover above the item, a drop-down menu would provide you with a list of sub-categories within “Electronics” such as headphones, mobile phones, and gaming consoles. In other words, drop-down menus help solve the problem of limited space by categorizing pages on the menu bar whilst still giving your website a professional, aesthetic look.
Step 1 Choosing a Theme for Drop-Down Menus.
WordPress’s built-in menu management system allows you to customize a bunch of features, including drop-down menus. However, not all websites can display drop-down menus properly.
This is because the display of drop-down menus depends entirely on the WordPress theme, and therefore, you need to make sure your WordPress theme supports drop-down menus before you create one.
The good news is, that most WordPress themes support drop-down menus by default. However, you can always check to be sure. All you have to do is visit the theme’s website and take a look at the theme’s demo. If the demo shows a drop-down menu, you’re good to go! But if it does not and you still want it, you’re going to have to switch to a WordPress theme that does support drop-down menus.
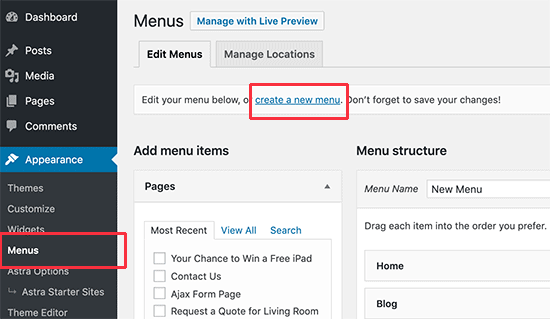
The first thing that your WordPress website is probably going to need is a navigation menu. If you already have one created, you can skip to the next step. Otherwise, you’re going to need to create a navigation menu first.
Go to the WordPress admin area, visit the Appearance page, and click on Menus. You’ll find a link called Create a new menu at the top.
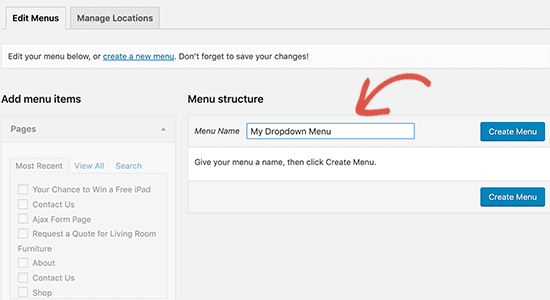
Once you click on that link, you will have to provide a name for the navigation menu. The name of the menu doesn’t matter, as it won’t be visible to visitors. The purpose of the name is for admins and webmasters to identify the menu, so you should still name it something meaningful. Once you’ve entered the name, click the Create Menu button, and you’ll have a new empty menu.
Source: https://www.wpbeginner.com/wp-tutorials/how-to-create-a-dropdown-menu-in-wordpress-beginners-guide/
With the menu now created, you can now add links to your menu. Look at the left-hand side of the Menus page, and you’ll notice a section called Add Menu Items. This section lists all the possible pages you might want to choose to add to your navigation menu. Check the boxes of the pages you want to show up in the navigation bar, and click on Add to Menu.
Source: https://www.wpbeginner.com/wp-tutorials/how-to-create-a-dropdown-menu-in-wordpress-beginners-guide/
The pages that you’ve added will now appear in the top row of your navigation menu.
Step 3 Add Sub-Items to Your Menu
You now have a navigation menu on your website, but it’s still incomplete. You need to add pages within the navigation menu items so that it appears as a drop-down list. These pages are called sub-items – the items that appear as categories within the drop-down menus. You can add them under any of the existing items on the navigation bar, depending on your preference.

Source: https://www.wpbeginner.com/wp-tutorials/how-to-create-a-dropdown-menu-in-wordpress-beginners-guide/
Adding sub-items is quite similar to adding menu items. Look at the left pane called Add Menu Items, and choose the pages or posts that you want to add as sub-items. Check the boxes, and click on Add to Menu. You’ll notice that these items have now been added to the menu on the right column.
However, these pages are still regular items. You need to transform them into sub-items under a parent. To do this click on a menu item that you want to turn into a sub-item, and place it under the parent item of the navigation bar. Click and drag the sub-item slightly to the right, and release – and you’ll notice a small heading called “Sub Item” appear beside the name of the page. The page is now a sub-item of its parent.

Source: https://www.wpbeginner.com/wp-tutorials/how-to-create-a-dropdown-menu-in-wordpress-beginners-guide/
There you go – you now have your first sub-item! Repeat the process for all the sub-items you need on your website and click on the Save Menu button to confirm the changes.
Step 4 Publish Your Menu
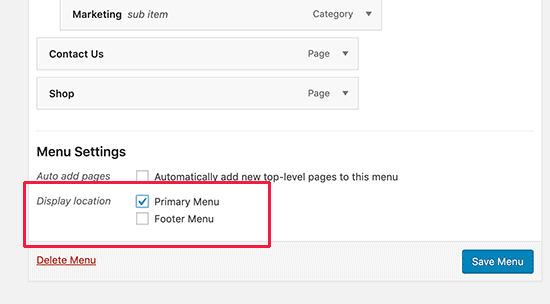
Once you’ve created the perfect dropdown menu in WordPress, you still need to publish it. If you’re editing an existing website that already had a menu, you’ll find that the changes are already live. However, if you’re building a website from scratch or creating a new menu item, you will need to choose a location where you want the menu to be displayed.
WordPress offers many different locations for the menu to show up, and each of these locations varies, depending on the theme. You can set the location of the menu on the Menu Settings section of the page.
The first thing to note in this section is the checkbox titled Auto Add Pages. If you check this box, whenever you add any new pages, they will be added to the menu. This is not recommended as it will make your website seem cramped and cluttered. Therefore, it’s best if you leave this box unchecked.
Below this checkbox, you’ll notice a section titled Display Locations. This is where you can select where to display your navigation menu. We recommend the header, as it is the first thing people usually notice when they visit a website. However, different themes have different names for the header, such as “Top Menu”, “Primary Menu”, or “Primary”, but they all mean the same thing. Choose the appropriate box where you want your drop-down navigation menu to be displayed, and click on the Save Menu button.
Source: https://www.wpbeginner.com/wp-tutorials/how-to-create-a-dropdown-menu-in-wordpress-beginners-guide/
And you’re done! Visit your website now, and you’ll notice a beautiful navigation panel that opens up several sub-items or categories as your mouse hovers over each item.
Additional Steps
At the basic level, a drop-down menu such as the one you created is enough to make a website look clean and organized. If you feel like your menu looks just the way you wanted it to be, you can ignore these steps if you want to. However, if you want to add a bit more style and elegance to your drop-down menu, there are a number of ways to do that.
One way to make the items and sub-items in your menus stand out more is by adding visual elements to them. These include images, icons, and clip-arts that can make the items look more visually pleasing and help users identify what they are looking for more quickly.
Whilst you can add images to your menu items using custom CSS, you can also download a plugin such as Menu Image to avoid all the coding. Once you’ve installed the plugin, go back to the Appearance > Menus page, and you’ll see an option to add images under each item of your menu. You can upload images as you please, and determine their size and position to make your drop-down menu bar look more perfect.
If you’re more confident with your coding skills, you can choose to customize your menus further using CSS. However, before you begin applying your custom CSS, you will need to add a class to your menu to ensure that other menus don’t get affected by it.
You can do this by clicking on Screen Option in the menu editor, and then checking the box for CSS Classes. This setting ensures that your custom CSS is only applied to the items of the drop-down menu specified within the CSS classes.
Tips for Adding Drop-Down Menus
Whilst knowing how to create drop-down menus in WordPress is fairly easy, there are many ways to optimize it so that it looks even more intuitive and simple. This helps your visitors to navigate the website more easily, increasing your page views, conversions, and sales. Take a look at a few tips that can help make your drop-down menus more interactive:
1- Order Matters
When creating a drop-down menu, the order of display matters. For example, if you’re building a website for a restaurant, you probably don’t want the “Lunch” sub-item to show up before “Breakfast” on the drop-down menu. You can drag and drop the sub-items in the menu settings to rearrange their order, with the topmost item showing up first.
2- Multi-Level Menus
Sometimes, your sub-items have sub-items, and even those sub-items can have more sub-items. Going back to the “Electronics” example, you might have a sub-item called “Headphones”. This category can be divided into even more categories – wired or wireless, in-ear, or over-ear. It is possible to add sub-items within another sub-item in the drop-down menu, allowing you to organize your web pages more efficiently.
3- Creating Mega Menus
Even with multi-level menus, sometimes your website might still look cluttered, especially if you have a lot of items to list as drop-down menus only show one drop-down at a time.
A workaround could be adding a mega menu that shows all the pages you want at the same time when the user visitor hovers over an item. It is possible to add mega menus as a drop-down menu as well and can help if you have a lot of pages to display.
4- Get Visual Cues
Making changes to your menu, clicking Save Changes, and returning to your website to review it can be quite a pain, especially if your drop-down menu is a complicated one. Switching to a visual preview can solve this problem.
Open up the Appearance page, and click on Customize to launch the live customizer. Now, click on the Menus tab and navigation menu. You can now edit the menu on the left panel of the page, with the changes being previewed in real-time in the right panel.
See also:
Easy Way To Do WordPress Dropdown Menu
Conclusion
In the end, drop-down menus are one of the most efficient and neat methods to organize a large number of web pages on your site, whilst providing your users with an intuitive and friendly experience. A properly designed drop-down navigation menu can greatly help visitors in working their way around the site. We hope this article gives you an idea of how to add a WordPress Drop Down Menu. We wish you the best of luck!