Change Domain Name WordPress. This post will show you how to change the WordPress domain name for a WordPress site step by step. Fortunately, the process is surprisingly easy if you simply change the main URL of your website. While you need to change some settings in two different locations, it’s a breeze. Let’s get started!
Contents
How To Change Domain Name on WordPress?
Buy a new domain name
- First, go to the Hostinger domain verifier and enter your preferred domain.
- You’ll find out if your option is available and you’ll get some suggestions on a few alternatives.
- From there, add your domain to the shopping cart and continue with checkout.
- Then register it to make sure it’s active.
- You can also get a free domain registration for the first year when you purchase Hostinger’s annual premium or business shared hosting plans.
Add the new domain name and upload the backup
- You must then add the new domain name to your existing hosting plan.
- Scroll down to Domains in the hPanel panel and select Add Website.
- Add your new domain name, create a password, and click Connect website using FileZilla and upload your website backup. If you use cloud hosting, you must also back up your database. But, If you use shared hosting, you don’t have to worry about it.
Change the URL of the website Using the WordPress admin panel
- The next step in changing the WordPress domain is to add your new domain to the general WordPress settings.
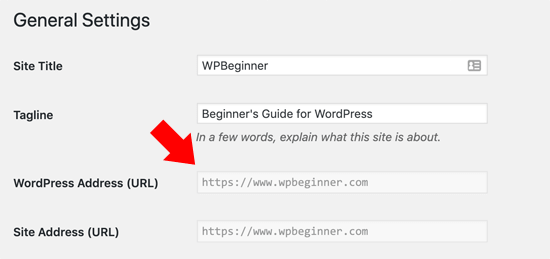
- Go to Panel -> Settings -> General.
- Replace your current WordPress address (URL to visit your website) and the site address (URL of your main files) with your new domain.
- Click Save Changes when you’re done. We’re not finished yet.
- Before reaccessing your site with the new address, follow the remaining steps below.
Update wp-config.php File
- To reflect changes made to WordPress settings, you must edit the wp-config.php file.
- You can access it from the hPanel file manager or via FileZilla.
- Go to hPanel -> Files -> File Manager.
- Select the domain and click Go to file manager.
- Locate the wp-config.php file in the public_html folder.
- Right click and select Edit. In the next snippet, replace http://yoursitename.com with your new WordPress domain name, paste it into the file and press Save and Close.
- Your wp-config.php file should look like this: “If you prefer to use an FTP client, the process is almost the same.
- You just need to use your FTP account credentials to access the files on the website.
Update your database
- Next, you need to update your WordPress site database: navigate to hPanel -> Databases -> phpMyAdmin.
- Select the database where the WordPress files are located and click Enter phpMyAdmin.
- On the phpMyAdmin page, search for the wp_options file.
- In the website URL and start lines, select Edit.
- Replace the current URL with your new domain and press Go.
Redirect the old WordPress domain permanently
- The last step in changing the WordPress domain requires you to create a 301 redirect: a URL redirect from your old domain to a new one. In addition, forwarding takes care of Google PageRank and ensures that all your efforts invested in SEO are not wasted when you move to a new domain.
- We recommend that you keep your old domain active for a while.
- This allows users to find you when they don’t know the domain change and allows search engines to recognize redirection.
- Let’s dive into the hPanel to edit the htaccess file and create a 301 redirect: go to hPanel -> Files -> File Manager. Select your old domain and click Go to file manager.
- Look for the htaccess file in the public_html directory.
- Right click and choose Edit. After replacing http://yoursitename.com with your new domain, paste the following code, and then press Save and Close.
- As with modifying wp-config.php, this step can be completed with an FTP client.
See also:
WordPress Best Themes for Blog
Best WordPress Videos Themes
Finally
Before you dive backwards into changing the domain name of your website, you should consider a few considerations. A little preparation is essential to ensure that the process is as smooth as possible.
A mistake could bring down your entire website, but if you put your resources and knowledge in order before you start, you can avoid this scenario.
For example, you might want to have a full backup of your website before you lift a finger. This way, in the worst case scenario, you can restore changes to a clean configuration and start over again. You must also use a file transfer protocol (FTP) client for some of these steps.
This allows you to access the server directly from the desktop and, while easy to use, requires a learning curve. As a result, you want to download a suitable client (we recommend FileZilla) and update FTP capabilities.
You will also need your server credentials to log in via FTP. You can usually find them in your hosting provider’s admin panel.
Finally, we will assume that you have already purchased a domain name and prepared it by pointing it to the correct nameservers. If not, you should make sure that this is cleared up before you do anything else.